Zoom Recording

When choosing to record a meeting or Webinar, Zoom can record in two different ways: local and cloud. 

Local: 

If recording locally, by default, all recordings will be placed in a Zoom folder found in the following file path on these devices: 

  • PC: C:\Users\User Name\Documents\Zoom 
  • Mac: /Users/User Name/Documents/Zoom 

Cloud: 

If recording to the cloud, you can view your recordings by signing into to https://ufl.zoom.us/ and clicking “Recordings.”  

Zoom Recording Best Practice: 

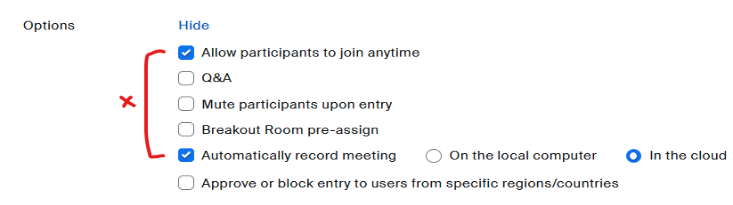
If your meeting is set to automatically record and the “Join before host” is enabled, this can result in many unnecessary recordings triggered by participants joining the meeting prior to the host. To prevent this, disable “Join before host” in the meeting settings. 

I’ve recorded my meeting and have an MP4 file. Now what?  

Video storage is available to faculty and staff with a MyMediasite account. You have the ability to upload, edit, and manage your own content, with hosting on the VCS Mediasite server. Faculty and staff are provided free storage for instructional purposes. 

To get started, visit our MyMediasite page.

I Already Have a MyMediasite Account. 

You can start uploading your Zoom recordings right away. Here are some steps on how to Manually Moving Zoom Recordings to MyMediasite

Zoom with Mediasite Integration

Zoom’s built-in storage for Cloud Recordings is not intended for long term storage. You may use UF’s Mediasite service if you wish to keep recordings longer than 180 days while still making them available online.

There are two ways to transfer Zoom’s Cloud Recordings into UF’s Mediasite:

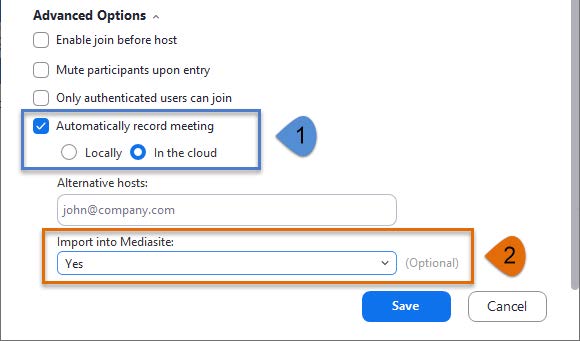
a) Automatic Import, configured prior to the Zoom meeting.

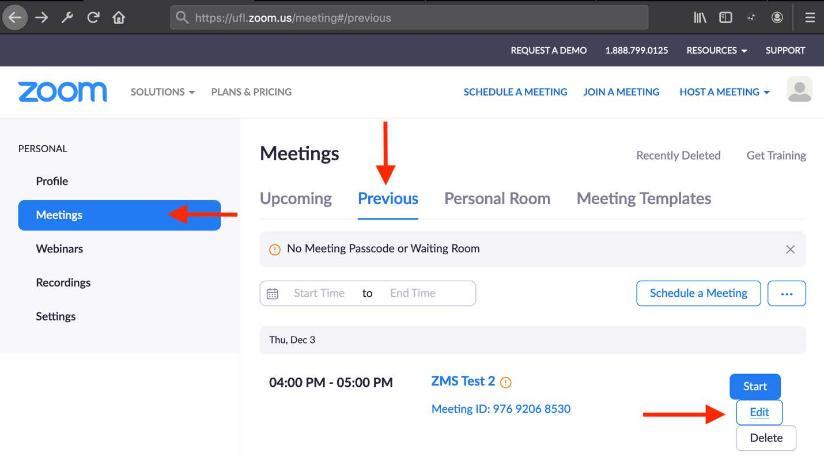
b) Manual import, after the meeting has completed.

a) Automatic Import

Mediasite’s newest integration with Zoom allows to automatically import a cloud recording and its audio transcripts to your MyMediasite account.

To automatically import Zoom cloud recordings, follow these steps:

  1. Make sure you have created a ‘MyMediasite’ account
  2. Go to your Zoom client and select ‘Schedule’ and enter the appropriate meeting information
  3. Expand ‘Advanced Options’ at the bottom.
    1. Select ‘Automatically record Meeting: In the Cloud’
    2. Set ‘Import into Mediasite’ to Yes
  4. A screenshot highlighting zoom features enabled
  5. Make sure to read the important Notes section below

b) Manual Import

To manually import your existing Zoom cloud recordings to your MyMediasite account, follow these steps:

  1. Make sure you have created a ‘MyMediasite’ account
  2. Login to the UF Zoom portal
  3. In the left pane, select ‘Meetings’, then Previous
  4. Find the meeting that corresponds to the meeting with the existing cloud recording you wish to import, and select ‘Edit’ (note the edit button only shows when the mouse hovers over the meeting)
    A Screenshot with features of Zoom highlighted
  5. Navigate  to ‘Import into Mediasite’ at the bottom of the page and select Yes.
  6. Click ‘Save’ and the recording import process will begin.

 Screenshot of zoom config

Important Notes:


  • In Canvas, the option to import into Mediasite can be found in the "Tracking Field" section of scheduling a meeting.
  • Recordings, by default, will import into your drafts folder.
  • Mediasite Import cannot be enabled from the in-meeting recording controls.
  • Under "Previous Meetings", you can view any past meetings up to 30 days.
  • Mediasite Import currently does not work for Webinars.
  • The Mediasite integration will only import cloud recordings. Local recordings will need to be manually uploaded.
  • When recordings are imported into Mediasite they are not removed from the Zoom Cloud. It is a best practice to regularly review your Zoom Cloud storage and remove recordings you no longer need.