Zoom Built-in Closed Captioning and Live Transcription
This feature is available to every licensed UF Zoom user at no additional costs, and provides the following two options:
- Automated Live Transcriptions: This uses a software engine to transcribe audio from Zoom sessions automatically.
- Manual Closed Captions: This allows the host to assign a Zoom meeting participant to manually type closed captions during the meeting. In this scenario, the host of the meeting must provide the individual.
Translated Captions: Allows participants to select their speaking language and translate to language during the meeting. Closed Captions are then translated in real time. The meeting host must have a translated captions license for this feature to be available. When the meeting host has the Translated Captions license every participant can select a language to translate to, even those who aren’t licensed. The Translated Captions license is available to faculty and staff and can be requested via MyIT.
3rd party Manual and Automated Live Transcription
Zoom also provides the ability to use other 3rd party live captioning services, which can provide ADA compliance. Please consult with the Disability Resource Center by emailing drc@ufsa.ufl.edu to consult on specific questions regarding facilitating live captioning services for students with disabilities.
Zoom Transcription & Captioning Options
| Zoom CC/LT Options |
Automated |
Fees |
Notes |
| Zoom Live Transcription |
Yes |
None |
Available to All UF |
| Zoom Manual CC |
Yes |
None |
Available to All UF |
| Translated Captions |
Yes |
None |
Requires License |
| Zoom 3rd Party |
Yes/No |
Yes |
Fees vary by provider |
Note that automated transcription services are not accurate enough to provide ADA compliance.
Zoom Built-In Automated Live Transcription
Who can use it and is there a fee?
Zoom's automated live transcription and Closed Caption service is available to everyone with a UF Zoom account and there are not additional fees to use it. To enable this service for your meetings, see the steps below.
Important: The only requirement is that your email address of contact in Zoom is your gatorlink@ufl.edu. This service will not be available if you are currently using a departmental email address or other 3rd level domains (e.g. name@dept.ufl.edu). If you wish to use the Zoom's LT/CC service, you will need to update the contact address in your profile via this link: https://ufl.zoom.us/profile
Can I include Live Transcription Closed Captions in all my meetings?
Closed captions are enabled and managed by the meeting host. The meeting host needs to first enable this feature for their account, and at that point they can manually turn the service on for any of their meetings by selecting the Live Transcription options.
Can Live Transcripts be Saved?
When you enable the service, there is an option listed below to Save Captions that will provide a save button to all participants.
- This creates a file in the local computer that is updated every time the Save button is clicked. There is no option to automatically save the transcript, and it only includes conversations up to the point when Save was last clicked.
- Be aware that the option to Save Captions cannot be limited to the host or specific participants; if enabled, all participants can choose to save the transcript.
A potential workaround is to select cloud recording for the session (if available for your account), and select the appropriate options in your personal settings to save the transcript automatically, in which case the host can choose to share the transcript or keep it private. Note that you can concurrently perform cloud recording and live transcription.
Enabling Live Transcription
Users must first enable the setting within their Zoom profile in order to use it in their meetings
- Sign-in to the UF Zoom portal https://ufl.zoom.us
- Click the Settings tab in the upper left corner
- Search for Closed captioning found in the In Meeting (Advanced) section
- Enable Closed Captioning and select the sub setting:
Enable live transcription service to show transcript on the side panel in-meeting
Enable Live Transcription the separate recording transcription service
Host:
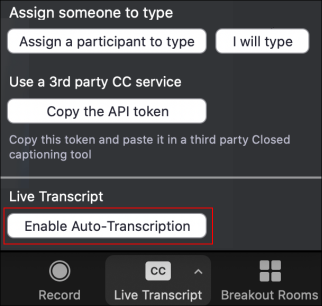
- Click Live Transcript at the bottom of the Zoom Toolbar.
- When the Live Transcription menu opens, click Enable Auto-Transcription.
Note: If the meeting is being recorded, and you have enabled Live Transcript, you will receive a copy of the transcript in the same location of your recorded meeting.
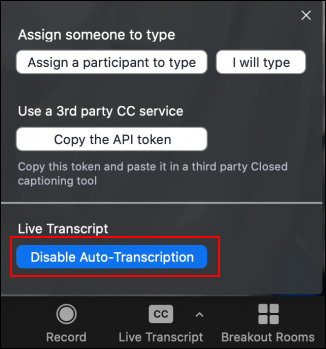
- To turn off Live Transcription, click Disable Auto-Transcription in the Live Transcript menu.
- Hosts also have the ability to disable Save Transcript. Click to toggle off Save Captions in the Settings tab of the Zoom web application.

Participant:
Once Live Transcription enabled, participants have the option to choose how they want to view the robot transcription feature.
- Click Live Transcript to choose a transcript option.
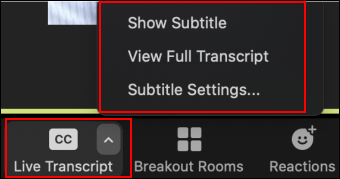
Show Subtitles displays subtitles on the screen.
View Full Transcript displays subtitles in real time with both the speaker's name and a time-stamp within the transcript window. We recommend this setting as best practice.
Subtitle Settings will open a window where you can adjust the font size of both the subtitles and the chat window.
- Click View Full Transcript to view subtitle and speaker.
- If you would like a copy of the transcript, click View Full Transcript and Save Transcript. A copy of the transcript will be downloaded to your machine. Note: The transcript saves up to the moment of clicking Save Transcript. We recommend you click Save Transcript just before the meeting ends to ensure you have the transcript from the entire meeting. Also note that this option may not be available if the host has disabled this feature.
Tips for using Live Transcription with Zoom:
- Use an External Microphone: An external microphone/headset provides better audio quality and, therefore, more accurately matches what is being said verbally.
- Speak Slowly: Speaking slowly enables a more accurate match to what is being said verbally and allows others to follow the automatic transcript or subtitles.
- Take Turns/Pause Before Speaking: Zoom's active speaker tracking is used to identify the speaker. When another individual begins speaking, it can take a second or two before Zoom updates the transcript to identify the new speaker.
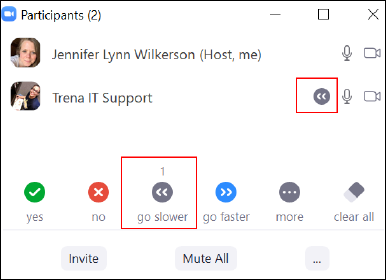
- Monitor the Participants Panel for the Go Slower function: Zoom's Participants panel displays all attendees and shows any nonverbal feedback the attendees provide. When using automatic live transcription, consider keeping the Participants panel open to see if attendees are indicating they need speakers to Go Slower.
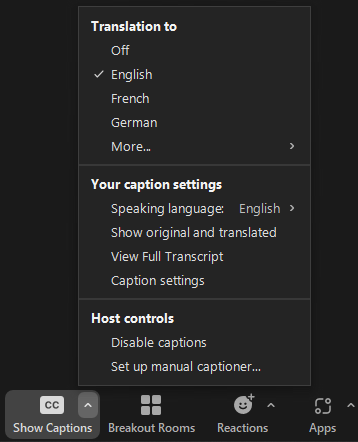
Using Translated Captions
- During the meeting click on Show Captions Icon
- Update your speaking language if needed
- Set Your Translation To language